
Networks Untangled - Part II
Editors note: Just in case you missed Part I of this article, Networks Untangled - Part I.
In our last article, we showed a simple network and gave an overview of what different network technologies were available. This month, we're going to take a more practical approach, and show you how you might want to set up a home or small office network.
Before we begin, however, we should carefully consider whether or not this is something you should do yourself or something that should be handled by a qualified network installer. Like any other do-it-yourself project, it comes down to how complicated the particular project is compared with how much time you have and what your skill level is. Having said that, there are definite situations where a qualified network installer should be brought in. For example, if network speed and reliability are of primary concern (such as with an Internet service provider, or if you are going to host a web site on this network), and you do not have experience in setting up a network, you should definitely consider bringing in a professional. Also, if you are going to run network cable through the walls or ceilings of a commercial building, there are building electric codes that have to be followed, and a qualified installer can advise you best.
At a minimum, you will need the following in order to network two or more computers together:
- A network switch or hub
- One network cable for each computer
- One network card for each computer
Note that more and more computers are offering a network card already built in, so check your computer before purchasing one.
Before going out and purchasing a bunch of supplies, the first thing to do is plan your network. Look at your floorplan and decide where you think computers are going to be placed. Then, decide on an appropriate central location for a network switch. For a simple setup, running network cables along floorboards may be acceptable. But for many environments, it is likely that you will want to run the cabling inside walls or through ceilings. Knowing this in advance will help you plan what accessories to buy. Once you know this, you can measure out how long each cable run is going to be. Network signals can travel a maximum of 100 meters (328 feet), so no single network cable run should ever be longer than that. (If you find you need to travel further, you can use a hub in between to connect two cables, although it's not a good idea to string more than about three hubs together along a network run.)
The other decision you will need to make is what sort of network card to purchase. These days, you can purchase an internal network card that gets installed inside the computer (traditionally, the most common choice), or, if your computer supports USB, you can use a USB Ethernet adapter that you simply plug in to the USB slot. USB Ethernet adapters are much easier to install, but they tend to be a bit more expensive and run the slight risk of becoming disconnected from the computer.
Constructing a simple network
In the simplest case, you do not have to run cables through walls or ceilings, and no run happens to be more than 150 feet. In this case, the best choice may be to purchase pre-manufactured network patch cables rather than attempting to make your own. At this point, it's simply a matter of installing the network card in your system, plugging one end of each cable into the computer and the other end into the network switch, and then configuring the computers to "see" the network. (These days, most operating systems can usually do this automatically, and simply accepting the default choices when the network card is being configured will get you on the network and able to share files and printers. However, this can become a complicated task, and the services of a qualified network engineer may be appropriate.)
A Step Further...
The problem with simply using pre-made network patch cables is that keeping a neat (and safe) cable run is not easy. In particular, you will likely find that, while you can run a patch cable along a floorboard, there comes a point where it has to leave the wall to connect to the computer or switch. A more desirable installation will have most of the cabling run through walls. Here's where things start to get interesting. In this scenario, you are most likely going to want to connect a patch cable from your computer to a network wall jack, and then run bulk network cable through the walls to wall jacks or a patch panel next to your hub.
Should you make your own patch cables?
We see many customers purchase 1000ft spools of bulk network cable, along with bags of connectors, boots, and crimp tools, with the intention of making their own cables and saving money. While this is certainly doable, there are some things to consider. First of all, unless you are quite experienced at making patch cables, it can be a time-consuming process. Also, if you do not invest in a decent network cable tester, you can waste a lot of time trying to figure out whether you have a miswired cable or other issue. Generally speaking, we recommend using bulk cable to wire into patch panels and wall jacks (a relatively easy task) and sticking with pre-manufactured patch cables for connecting devices together.
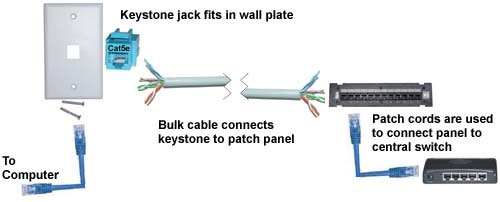
In the picture above, we've used the following equipment to achieve a typical in-wall run:
- A one-port keystone wall plate
- A blue Cat5e keystone jack
- A run of UTP solid-core bulk network cable
- A 12-port wall-mounted Cat5e patch panel
- A short patch cable to connect the panel to the switch.
Let's look for a moment at the anatomy of network cable, as we will need to understand this in order to wire up keystones and patch panels. Inside a network cable, there are four pairs of color-coded wires twisted together. The colors are:
| Green | Blue | ||
| Green / White | Blue / White | ||
| Orange | Brown | ||
| Orange / White | 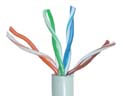 | Brown / White | |
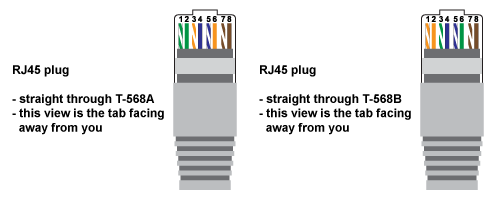
Most keystone jacks and patch panels are very easy to wire up, as they have diagrams showing where to connect each of the eight wires. They will generally come with a small tool to help you push the wires into the jack. However, you will generally find two wiring diagrams, typically labelled "568A" and "568B." These are standard wiring conventions that all devices follow. For historical reasons, however, there are two differing standards. In practice, it does not matter which of the two you follow; however, whichever one you choose to use, you must be consistent with that choice throughout your network. Once you have made that decision, wiring the devices involves the following steps:
- Pull enough wire to run between the patch panel and wall jack so that there is slack in the cable. Make sure you do not bend the wire too sharply (about 2" bending radius is a nice, conservative number). Pull a little more than you think you need, to allow you to trim extra if you make a mistake.
- Strip about 1" of the outer jacket from the cable. Make sure you do not cut into the jackets of the individual wires.
- Untwist the pairs of wires only enough to be able to connect them to the panel.
- Follow the wiring diagram on the panel, using the included tool to "punch" the wire into the panel connections.
- Repeat steps 2-4 on the keystone jack.
- Use a network tester to verify that the run has been installed correctly.
- Finally, once you have connected the keystone jack to the wall plate, take the time to label both the jack and the corresponding connection on the patch panel with a code (such as a number) to help you trace the connection in the future.
You can repeat the above procedure for every location where you want to place a jack.
If time and budgets allow, you may want to consider connecting more jacks than you initially anticipate needing. Networks have a way of unexpectedly expanding, and you will appreciate having done that work in the beginning.
Once all of your wall jacks have been wired to the patch panel, you can mount a switch underneath the panel and connect the two together using short patch cords. (Note that although it is possible to bypass the panel and connect the cables direct to the switch, this involves crimping on an RJ45 network connector, which takes some experience and tends to be too time-consuming for the average user. Patch panels also offer a cleaner appearance.) After that, the only step left is to hook up the computers to their respective wall jacks using patch cables, configure the computers (if not already done by the operating system), and your network is up and running.
At this stage, you have a network where computers can talk to each other. While convenient, this is usually not the only goal. You often want these computers to share a connection to the Internet. Assuming your home or office has a broadband (i.e., DSL, cable modem, or T1) connection to the Internet, connecting your internal network up is a fairly straightforward task. Broadband routers are specifically designed for this task. Simply plug the network connection from the DSL or cable modem into the "uplink" port of the broadband router, and then connect the broadband router to your switch. The router will do the job of providing internet addresses to each of your computers. Note that most broadband routers have a built-in four port switch, so if you have four or fewer computers, the broadband router can serve as both router and switch.
Here are a few other tips that are helpful when building up a network.
- In the U.S., commercial building codes require that electrical cable (including network cable) run through ceilings meet certain fire retardant properties. Generally, the use of CMP, or plenum-rated cable, is required.
- If network cables are going to be run alongside electrical cables, using shielded network cables is highly recommended. Otherwise, interference from the electrical lines can cause data loss.
- Surface mount boxes are convenient when you are running bulk cable along the floorboards instead of inside the walls. They are generally as easy to wire as keystones.
- Patch cables can be connected together using a network cable coupler. Make sure that the coupler is rated for Cat5E or Cat6 cable.
Finally, note that we have not discussed wireless networking in this article. Wireless networking has its own share of products, installation techniques, and technical issues. We will examine wireless networking in a separate technical article.